本文由RT-Thread论坛用户@BruceOu原创发布:
https://club.rt-thread.org/ask/article/3043.html
熟悉RT-Thread的朋友都知道,RT-Thread提供了许多BSP,但不是所有的板子都能找到相应的BSP,这时就需要移植新的BSP。RT-Thread的所有BSP中,最完善的BSP就是STM32系列,但从2020年下半年开始,国内出现史无前例的芯片缺货潮,芯片的交期和价格不断拉升,STM32的价格也是水涨船高,很多朋友也在考虑使用国产替代,笔者使用的兆易创新的GD32系列,我看了下RT-Thread中GD系列BSP,都是玩家各自为政,每个人都是提交自己使用的板子的BSP,充斥着大量冗余的代码,对于有强迫症的我就非常不爽,就根据手头的板子,参看STM32的BSP架构,构建了GD32的BSP架构。
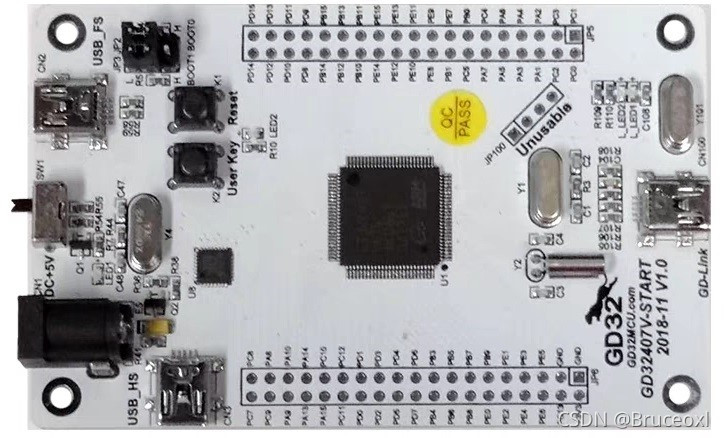
笔者使用的开发板是兆易创新设计的GD32407V-START开发板。其主控芯片为GD32F407VKT6,主频168MHz,内部3072K Flash,192KB SRAM,资源相当丰富。
1 BSP 框架制作
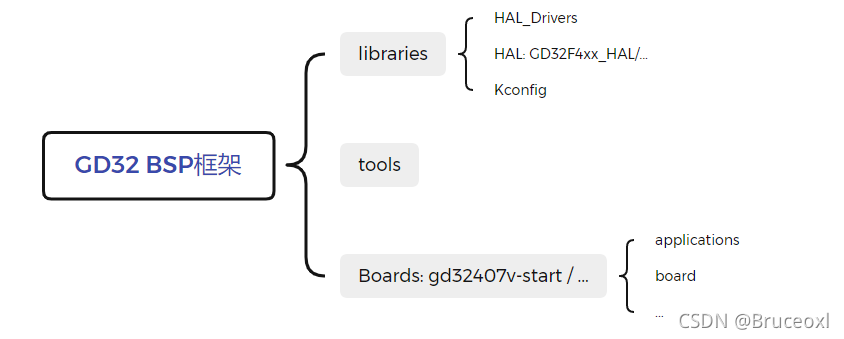
在具体移植GD32407V-START的BSP之前,先做好GD32的BSP架构。BSP 框架结构如下图所示:
GD32的BSP架构主要分为三个部分:libraries、tools和具体的Boards,其中libraries包含了GD32的通用库,包括每个系列的HAL以及适配RT-Thread的drivers;tools是生成工程的Python脚本工具;另外就是Boards文件,当然这里的Boards有很多,我这里值列举了GD32407V-START。
这里先谈谈libraries和tools的构建,然后在后文单独讨论具体板级BSP的制作。
1.1 Libraries构建
Libraries文件夹包含兆易创新提供的HAL库,这个直接在兆易创新的官网就可以下载。
下载地址
然后将HAL库复制到libraries目录下,重命名为GD32F4xx_HAL,其他的系列类似。
GD32F4xx_HAL就是官方的文件,基本是不用动的,只是在文件夹中需要添加构建工程的脚本文件SConscript,其实也就是Python脚本。
SConscript文件的内容如下:
import rtconfig
from building import *
cwd = GetCurrentDir( )
src = Split( '''
CMSIS/GD/GD32F4xx/Source/system_gd32f4xx.c
GD32F4xx_standard_peripheral/Source/gd32f4xx_gpio.c
GD32F4xx_standard_peripheral/Source/gd32f4xx_rcu.c
GD32F4xx_standard_peripheral/Source/gd32f4xx_exti.c
GD32F4xx_standard_peripheral/Source/gd32f4xx_misc.c
GD32F4xx_standard_peripheral/Source/gd32f4xx_syscfg.c
''' )
if GetDepend( [ 'RT_USING_SERIAL' ] ) :
src += [ 'GD32F4xx_standard_peripheral/Source/gd32f4xx_usart.c' ]
if GetDepend( [ 'RT_USING_I2C' ] ) :
src += [ 'GD32F4xx_standard_peripheral/Source/gd32f4xx_i2c.c' ]
if GetDepend( [ 'RT_USING_SPI' ] ) :
src += [ 'GD32F4xx_standard_peripheral/Source/gd32f4xx_spi.c' ]
if GetDepend( [ 'RT_USING_CAN' ] ) :
src += [ 'GD32F4xx_standard_peripheral/Source/gd32f4xx_can.c' ]
if GetDepend( [ 'BSP_USING_ETH' ] ) :
src += [ 'GD32F4xx_standard_peripheral/Source/gd32f4xx_enet.c' ]
if GetDepend( [ 'RT_USING_ADC' ] ) :
src += [ 'GD32F4xx_standard_peripheral/Source/gd32f4xx_adc.c' ]
if GetDepend( [ 'RT_USING_DAC' ] ) :
src += [ 'GD32F4xx_standard_peripheral/Source/gd32f4xx_dac.c' ]
if GetDepend( [ 'RT_USING_RTC' ] ) :
src += [ 'GD32F4xx_standard_peripheral/Source/gd32f4xx_rtc.c' ]
if GetDepend( [ 'RT_USING_WDT' ] ) :
src += [ 'GD32F4xx_standard_peripheral/Source/gd32f4xx_wwdgt.c' ]
src += [ 'GD32F4xx_standard_peripheral/Source/gd32f4xx_fwdgt.c' ]
if GetDepend( [ 'RT_USING_SDIO' ] ) :
src += [ 'GD32F4xx_standard_peripheral/Source/gd32f4xx_sdio.c' ]
path = [
cwd + '/CMSIS/GD/GD32F4xx/Include' ,
cwd + '/CMSIS' ,
cwd + '/GD32F4xx_standard_peripheral/Include' , ]
CPPDEFINES = [ 'USE_STDPERIPH_DRIVER' ]
group = DefineGroup( 'Libraries' , src, depend = [ '' ] , CPPPATH = path, CPPDEFINES = CPPDEFINES)
Return( 'group' )
1 2 3 4 5 6 7 8 9 10 11 12 13 14 15 16 17 18 19 20 21 22 23 24 25 26 27 28 29 30 31 32 33 34 35 36 37 38 39 40 41 42 43 44 45 46 47 48 49 50 51 52 53 54 55 56 57 58 59 1 2 3 4 5 6 7 8 9 10 11 12 13 14 15 16 17 18 19 20 21 22 23 24 25 26 27 28 29 30 31 32 33 34 35 36 37 38 39 40 41 42 43 44 45 46 47 48 49 50 51 52 53 54 55 56 57 58 59
该文件主要的作用就是添加库文件和头文件路径,一部分文件是属于基础文件,因此直接调用Python库的Split包含,另外一部分文件是根据实际的应用需求添加的。
这里是以GDF4来举例的,其他系列的都是类似的。
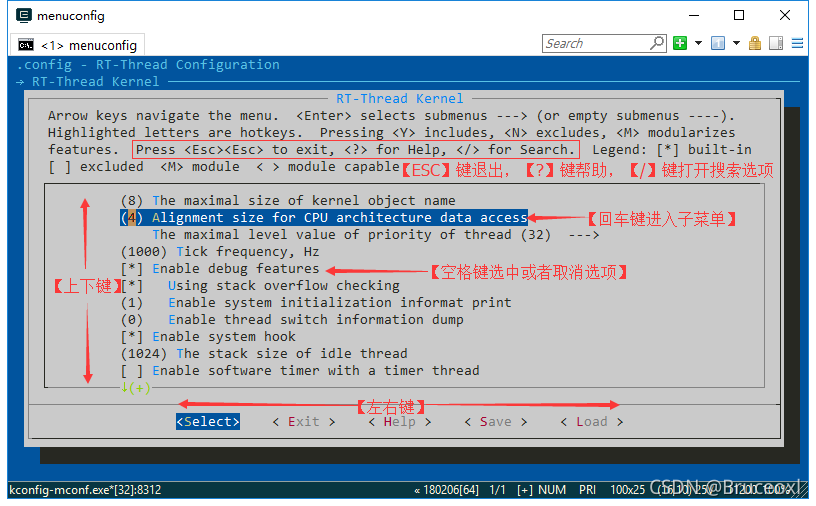
接下来说说Kconfig文件,这里是对内核和组件的功能进行配置,对RT-Thread的组件进行自由裁剪。
如果使用ENV环境,则在使用 menuconfig配置和裁剪 RT-Thread时体现。
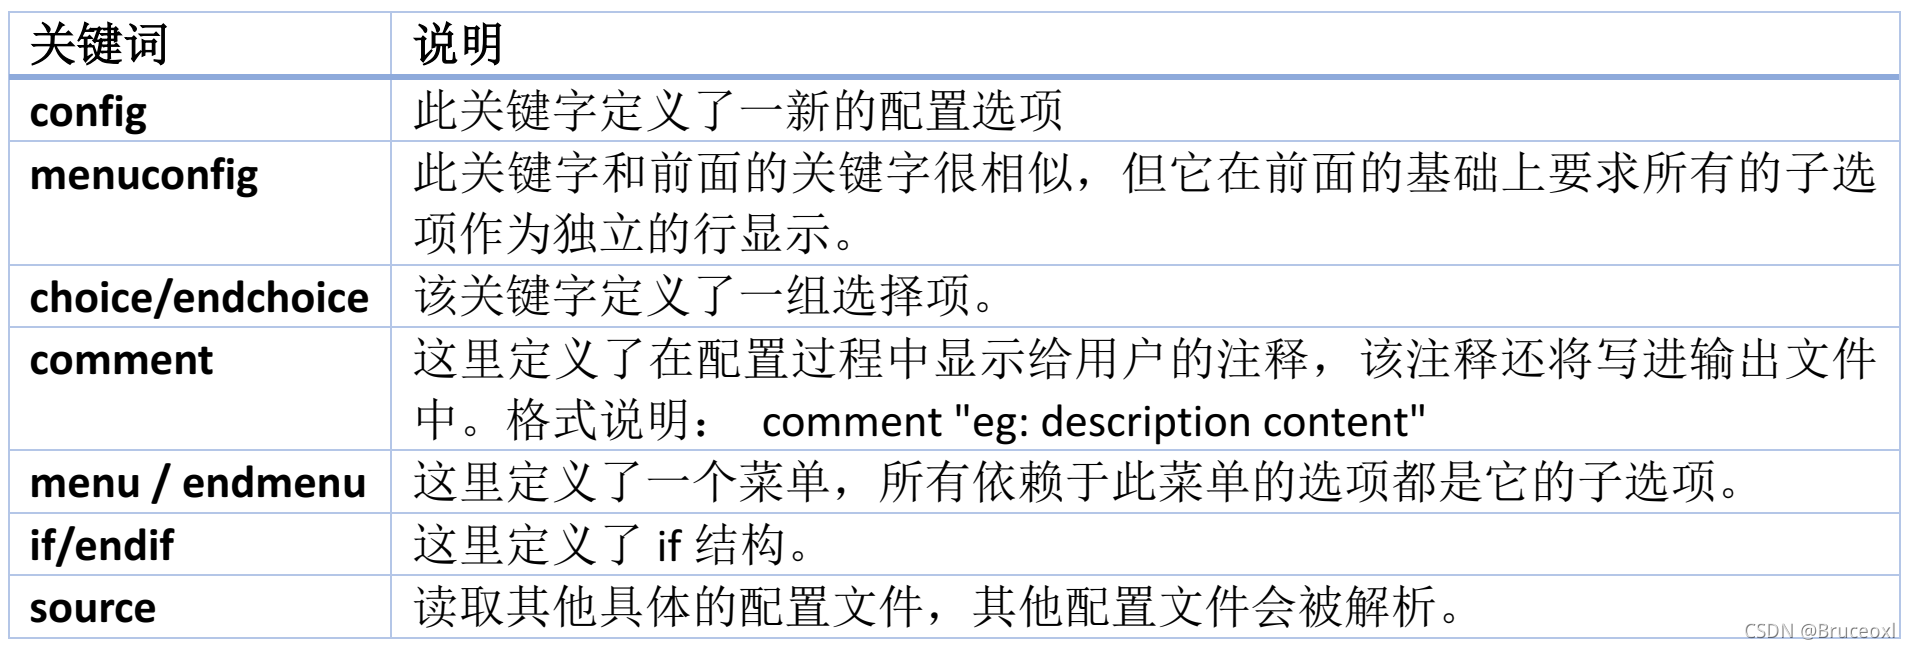
后面所有的Kconfig文件都是一样的逻辑。下表列举一些常用的Kconfig句法规则。
Kconfig的语法规则网上资料很多,自行去学习吧。
bsp/gd32/Kconfig内容如下:
config SOC_FAMILY_GD32
    bool

config SOC_SERIES_GD32F4
    bool
    select ARCH_ARM_CORTEX_M4
    select SOC_FAMILY_GD32
因为该架构目前笔者只移植了GDF4的,因此这里的内容比较少,如果有些的系列,直接参考F4的配置例子在这里加就可以了。
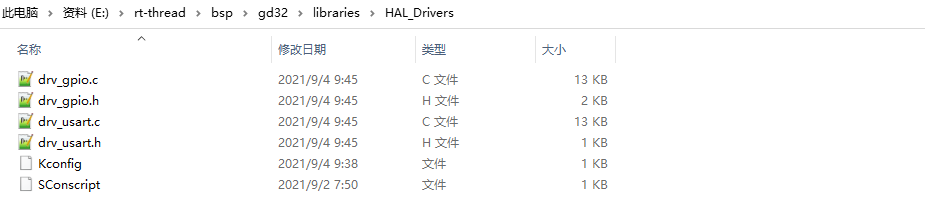
最后谈谈HAL_Drivers,这个文件夹就是GD32的外设驱动文件夹,为上层应用提供调用接口。
目前只有串口和GPIO的驱动,该文件夹是整个GD32共用的,因此在编写和修改都要慎重。关于drv_xxx文件在后句具体移植BSP的时候讲解,这里主要将整体架构,SConscript和Kconfig的作用和前面的一样,只是具体的内容不同罢了。
好了,先看bsp/gd32/HAL_Drivers/SConscript文件。
Import( 'RTT_ROOT' )
Import( 'rtconfig' )
from building import *
cwd = GetCurrentDir( )
src = Split( """
""" )
if GetDepend( 'RT_USING_PIN' ) :
src += [ 'drv_gpio.c' ]
if GetDepend( [ 'RT_USING_SERIAL' ] ) :
src += [ 'drv_usart.c' ]
path = [ cwd]
group = DefineGroup( 'Drivers' , src, depend = [ '' ] , CPPPATH = path)
Return( 'group' )
1 2 3 4 5 6 7 8 9 10 11 12 13 14 15 16 17 18 19 20 21 22 1 2 3 4 5 6 7 8 9 10 11 12 13 14 15 16 17 18 19 20 21 22
和GD32F4xx_HAL文件夹中的SConscript是类似的。
bsp/gd32/HAL_Drivers/Kconfig文件结构如下:
if BSP_USING_USBD
config BSP_USBD_TYPE_FS
bool
config BSP_USBD_TYPE_HS
bool
config BSP_USBD_SPEED_HS
bool
config BSP_USBD_SPEED_HSINFS
bool
config BSP_USBD_PHY_EMBEDDED
bool
config BSP_USBD_PHY_UTMI
bool
config BSP_USBD_PHY_ULPI
bool
endif
1 2 3 4 5 6 7 8 9 10 11 12 13 14 15 16 17 18 19 20 21 22 23 24 25 1 2 3 4 5 6 7 8 9 10 11 12 13 14 15 16 17 18 19 20 21 22 23 24 25
1.2 Tools构建
该文件夹就是工程构建的脚本,
import os
import sys
import shutil
cwd_path = os. getcwd( )
sys. path. append( os. path. join( os. path. dirname( cwd_path) , 'rt-thread' , 'tools' ) )
def dist_do_building ( BSP_ROOT, dist_dir) :
from mkdist import bsp_copy_files
import rtconfig
print ( "=> copy gd32 bsp library" )
library_dir = os. path. join( dist_dir, 'libraries' )
library_path = os. path. join( os. path. dirname( BSP_ROOT) , 'libraries' )
bsp_copy_files( os. path. join( library_path, rtconfig. BSP_LIBRARY_TYPE) ,
os. path. join( library_dir, rtconfig. BSP_LIBRARY_TYPE) )
print ( "=> copy bsp drivers" )
bsp_copy_files( os. path. join( library_path, 'HAL_Drivers' ) , os. path. join( library_dir, 'HAL_Drivers' ) )
shutil. copyfile( os. path. join( library_path, 'Kconfig' ) , os. path. join( library_dir, 'Kconfig' ) )
1 2 3 4 5 6 7 8 9 10 11 12 13 14 15 16 17 18 19 20 21 22 1 2 3 4 5 6 7 8 9 10 11 12 13 14 15 16 17 18 19 20 21 22
以上代码很简单,主要使用了Python的OS模块的join函数,该函数的作用就是连接两个或更多的路径名。最后将BSP依赖的文件复制到指定目录下。
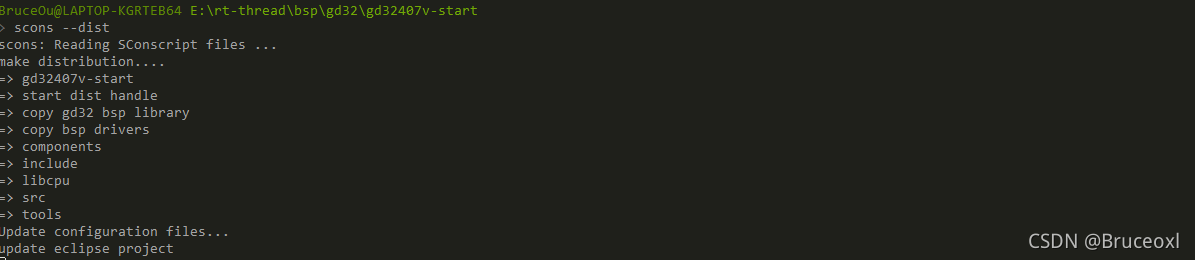
在使用scons --dist 命令打包的时候,就是依赖的该脚本,生成的dist 文件夹的工程到任何目录下使用,也就是将BSP相关的库以及内核文件提取出来,可以将该工程任意拷贝。
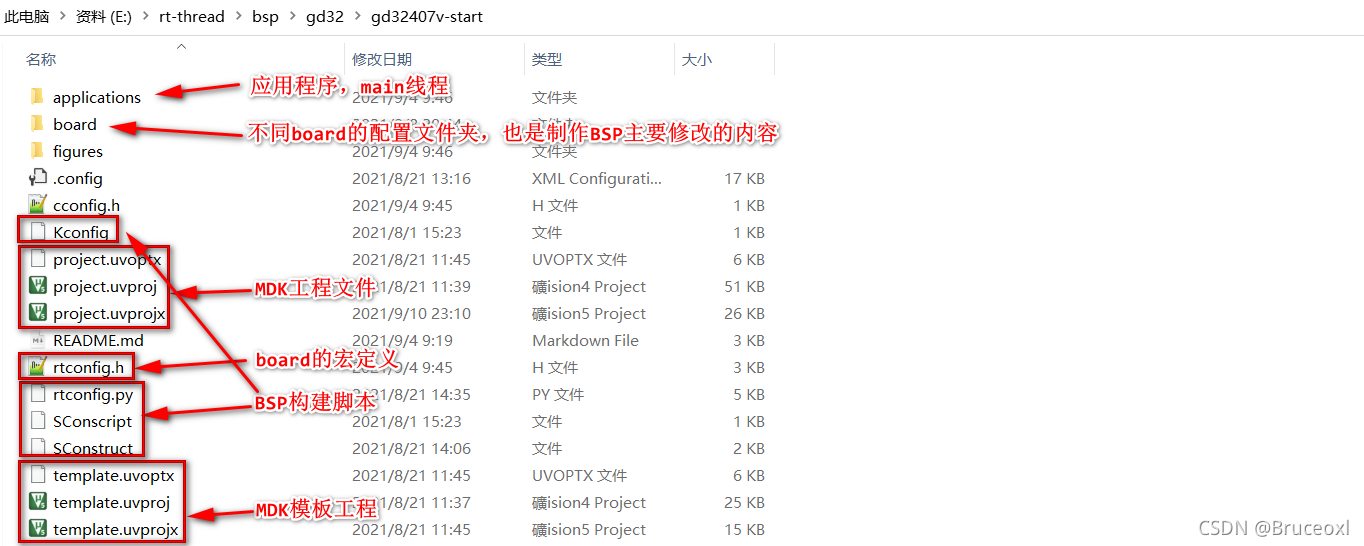
1.3 gd32407v-start构建
该文件夹就gd32407v-start的具体BSP文件,文件结构如下:
在后面将具体讲解如何构建该部分内容。
2 BSP移植
2.1 Keil环境准备
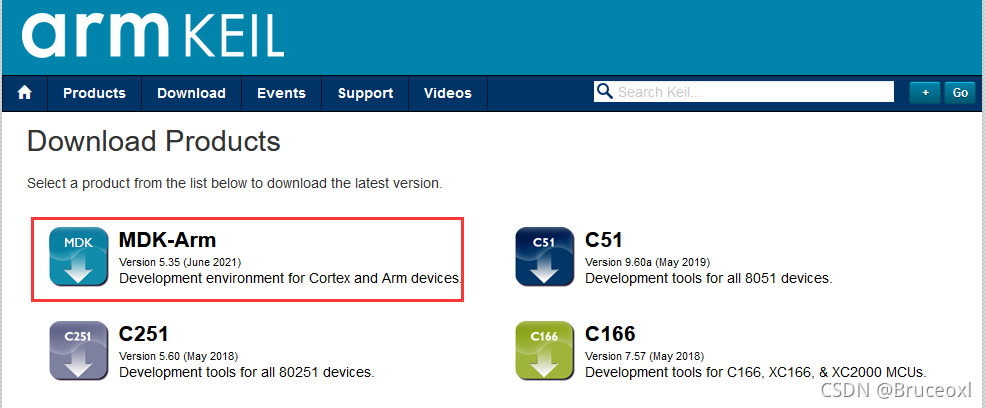
目前市面通用的MDK for ARM版本有Keil 4和Keil 5:使用Keil 4建议安装4.74及以上;使用Keil 5建议安装5.20以上版本。笔者的MDK是5.30。
从MDK的官网可以下载得到MDK的安装包,然后安装即可,关于的MDK安装请看笔者的教程。
安装完成后会自动打开,我们将其关闭。
接下来我们下载GD32F30x的软件支持包。
下载地址:http://www.gd32mcu.com/cn/download
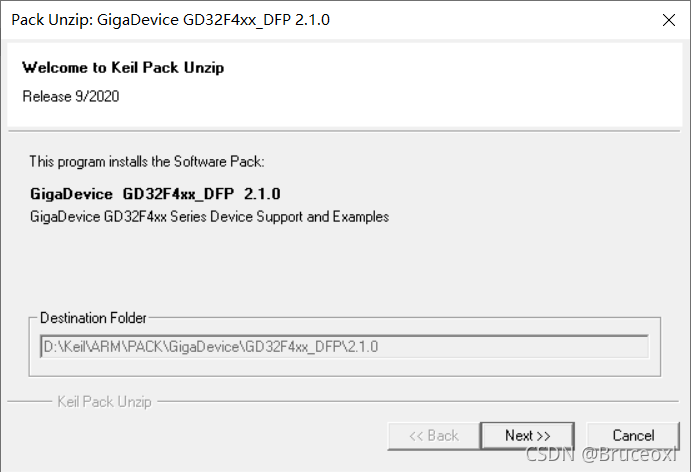
下载好后双击GigaDevice.GD32F4xx_DFP.2.1.0.pack运行即可:
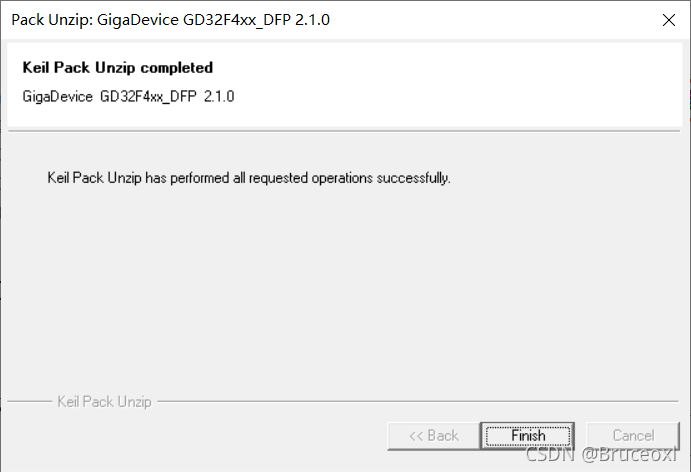
点击[Next]即可安装完成。
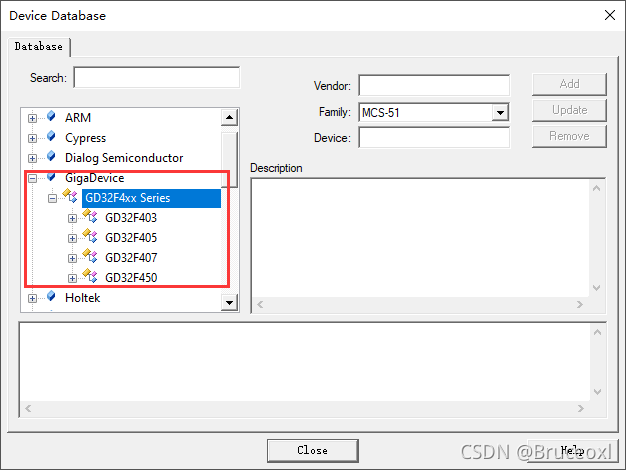
安装成功后,重新打开Keil,则可以在File->Device Database中出现Gigadevice的下拉选项,点击可以查看到相应的型号。
2.2 BSP工程制作
1.构建基础工程
2.修改BSP构建脚本
mainmenu "RT-Thread Configuration"
config BSP_DIR
string
option env = "BSP_ROOT"
default "."
config RTT_DIR
string
option env = "RTT_ROOT"
default "../../.."
config PKGS_DIR
string
option env = "PKGS_ROOT"
default "packages"
source "$RTT_DIR /Kconfig"
source "$PKGS_DIR /Kconfig"
source "../libraries/Kconfig"
source "board/Kconfig"
1 2 3 4 5 6 7 8 9 10 11 12 13 14 15 16 17 18 19 20 21 1 2 3 4 5 6 7 8 9 10 11 12 13 14 15 16 17 18 19 20 21
该文件是获取所有路径下的Kconfig。
bsp/gd32/gd32407v-start/SConscript修改后的内容如下:
import os
Import( 'RTT_ROOT' )
from building import *
cwd = GetCurrentDir( )
objs = [ ]
list = os. listdir( cwd)
for d in list :
path = os. path. join( cwd, d)
if os. path. isfile( os. path. join( path, 'SConscript' ) ) :
objs = objs + SConscript( os. path. join( d, 'SConscript' ) )
Return( 'objs' )
该文件是用于遍历当前目录的所有文件夹。
bsp/gd32/gd32407v-start/SConstruct修改后的内容如下:
import os
import sys
import rtconfig
if os. getenv( 'RTT_ROOT' ) :
RTT_ROOT = os. getenv( 'RTT_ROOT' )
else :
RTT_ROOT = os. path. normpath( os. getcwd( ) + '/../../..' )
sys. path = sys. path + [ os. path. join( RTT_ROOT, 'tools' ) ]
try :
from building import *
except :
print ( 'Cannot found RT-Thread root directory, please check RTT_ROOT' )
print ( RTT_ROOT)
exit( - 1 )
TARGET = 'rtthread.' + rtconfig. TARGET_EXT
DefaultEnvironment( tools= [ ] )
env = Environment( tools = [ 'mingw' ] ,
AS = rtconfig. AS, ASFLAGS = rtconfig. AFLAGS,
CC = rtconfig. CC, CCFLAGS = rtconfig. CFLAGS,
AR = rtconfig. AR, ARFLAGS = '-rc' ,
CXX = rtconfig. CXX, CXXFLAGS = rtconfig. CXXFLAGS,
LINK = rtconfig. LINK, LINKFLAGS = rtconfig. LFLAGS)
env. PrependENVPath( 'PATH' , rtconfig. EXEC_PATH)
if rtconfig. PLATFORM == 'iar' :
env. Replace( CCCOM = [ '$CC $CCFLAGS $CPPFLAGS $_CPPDEFFLAGS $_CPPINCFLAGS -o $TARGET $SOURCES' ] )
env. Replace( ARFLAGS = [ '' ] )
env. Replace( LINKCOM = env[ "LINKCOM" ] + ' --map rtthread.map' )
Export( 'RTT_ROOT' )
Export( 'rtconfig' )
SDK_ROOT = os. path. abspath( './' )
if os. path. exists( SDK_ROOT + '/libraries' ) :
libraries_path_prefix = SDK_ROOT + '/libraries'
else :
libraries_path_prefix = os. path. dirname( SDK_ROOT) + '/libraries'
SDK_LIB = libraries_path_prefix
Export( 'SDK_LIB' )
objs = PrepareBuilding( env, RTT_ROOT, has_libcpu= False )
gd32_library = 'GD32F4xx_HAL'
rtconfig. BSP_LIBRARY_TYPE = gd32_library
objs. extend( SConscript( os. path. join( libraries_path_prefix, gd32_library, 'SConscript' ) ) )
objs. extend( SConscript( os. path. join( libraries_path_prefix, 'HAL_Drivers' , 'SConscript' ) ) )
DoBuilding( TARGET, objs)
1 2 3 4 5 6 7 8 9 10 11 12 13 14 15 16 17 18 19 20 21 22 23 24 25 26 27 28 29 30 31 32 33 34 35 36 37 38 39 40 41 42 43 44 45 46 47 48 49 50 51 52 53 54 55 56 57 58 59 60 1 2 3 4 5 6 7 8 9 10 11 12 13 14 15 16 17 18 19 20 21 22 23 24 25 26 27 28 29 30 31 32 33 34 35 36 37 38 39 40 41 42 43 44 45 46 47 48 49 50 51 52 53 54 55 56 57 58 59 60
该文件用于链接所有的依赖文件,并调用make进行编译。
3.修改开发环境信息
# ifndef CCONFIG_H__ # define CCONFIG_H__ # define HAVE_NEWLIB_H 1 # define LIBC_VERSION "newlib 2.4.0" # define HAVE_SYS_SIGNAL_H 1 # define HAVE_SYS_SELECT_H 1 # define HAVE_PTHREAD_H 1 # define HAVE_FDSET 1 # define HAVE_SIGACTION 1 # define GCC_VERSION_STR "5.4.1 20160919 (release) [ARM/embedded-5-branch revision 240496]" # define STDC "2011" # endif
1 2 3 4 5 6 7 8 9 10 11 12 13 14 15 16 17 18 1 2 3 4 5 6 7 8 9 10 11 12 13 14 15 16 17 18
该文件是是编译BSP的环境信息,需根据实时修改。
4.修改KEIL的模板工程
双击:template.uvprojx即可修改模板工程。
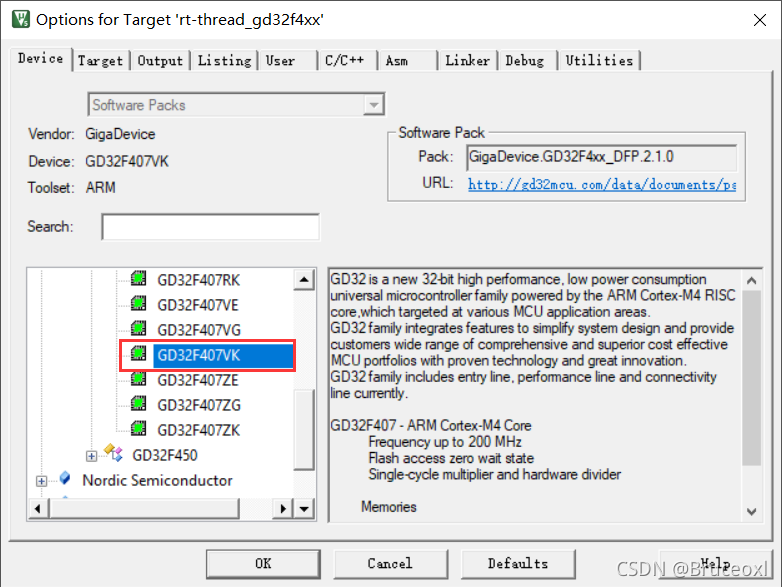
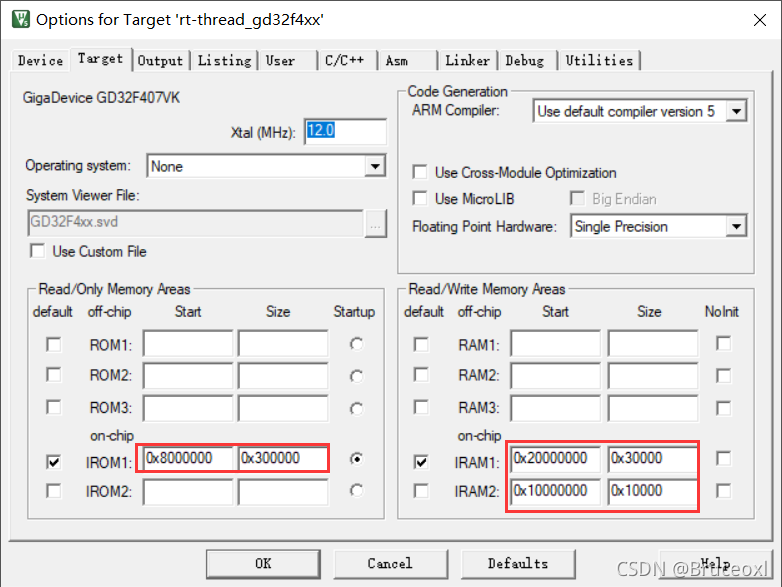
修改为对应芯片设备:
修改FLASH和RAM的配置:
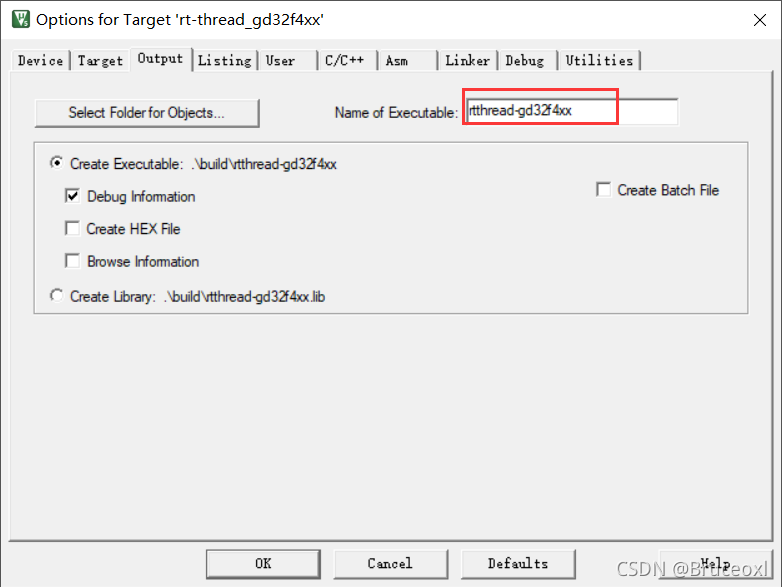
修改可执行文件名字:
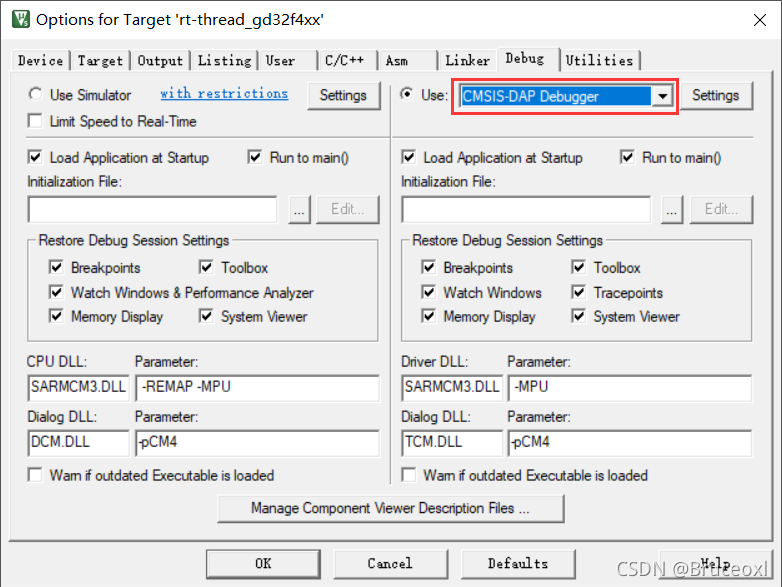
修改默认调试工具:CMSIS-DAP Debugger。
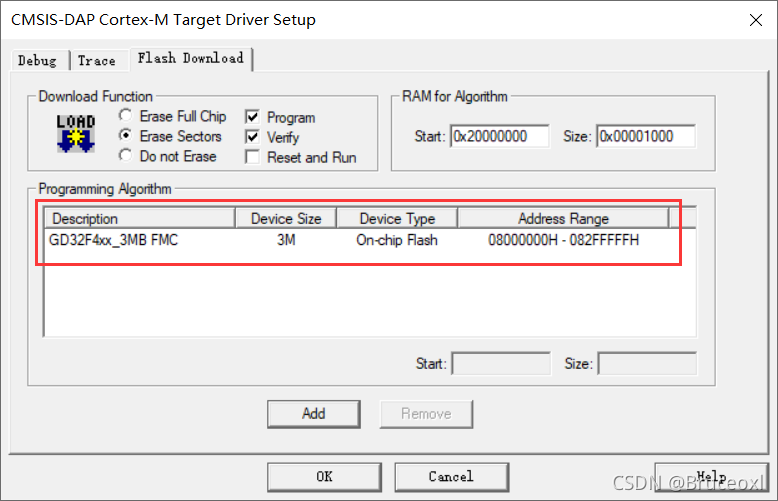
修改编程算法:GD32F4xx FMC。
5.修改board文件夹
修改后的内容如下:
/*
/*-Editor annotation file-*/
/* IcfEditorFile = "$TOOLKIT_DIR $\c onfig\ide\IcfEditor\c ortex_v1_0.xml" */
/*-Specials-*/
define symbol __ICFEDIT_intvec_start__ = 0x08000000;
/*-Memory Regions-*/
define symbol __ICFEDIT_region_ROM_start__ = 0x08000000;
define symbol __ICFEDIT_region_ROM_end__ = 0x082FFFFF;
define symbol __ICFEDIT_region_RAM_start__ = 0x20000000;
define symbol __ICFEDIT_region_RAM_end__ = 0x2002FFFF;
/*-Sizes-*/
define symbol __ICFEDIT_size_cstack__ = 0x2000;
define symbol __ICFEDIT_size_heap__ = 0x2000;
/**** End of ICF editor section.
export symbol __ICFEDIT_region_RAM_end__;
define symbol __region_RAM1_start__ = 0x10000000;
define symbol __region_RAM1_end__ = 0x1000FFFF;
define memory mem with size = 4G;
define region ROM_region = mem:[ from __ICFEDIT_region_ROM_start__ to __ICFEDIT_region_ROM_end__] ;
define region RAM_region = mem:[ from __ICFEDIT_region_RAM_start__ to __ICFEDIT_region_RAM_end__] ;
define region RAM1_region = mem:[ from __region_RAM1_start__ to __region_RAM1_end__] ;
define block CSTACK with alignment = 8 , size = __ICFEDIT_size_cstack__ { } ;
define block HEAP with alignment = 8 , size = __ICFEDIT_size_heap__ { } ;
initialize by copy { readwrite } ;
do not initialize { section .noinit } ;
keep { section FSymTab } ;
keep { section VSymTab } ;
keep { section .rti_fn* } ;
place at address mem:__ICFEDIT_intvec_start__ { readonly section .intvec } ;
place in ROM_region { readonly } ;
place in RAM_region { readwrite,
block CSTACK, block HEAP } ;
place in RAM1_region { section .sram } ;
1 2 3 4 5 6 7 8 9 10 11 12 13 14 15 16 17 18 19 20 21 22 23 24 25 26 27 28 29 30 31 32 33 34 35 36 37 38 39 40 1 2 3 4 5 6 7 8 9 10 11 12 13 14 15 16 17 18 19 20 21 22 23 24 25 26 27 28 29 30 31 32 33 34 35 36 37 38 39 40
该文件是IAR编译的链接脚本,根据《GD32F407xx_Datasheet_Rev2.1》可知,GD32F407VKT6的flash大小为3072KB,SRAM大小为192KB,因此需要设置ROM和RAM的起始地址和堆栈大小等。
(2) 修改bsp/gd32/gd32407v-start/board/linker_scripts/link.ld
修改后的内容如下:
/* Program Entry, set to mark it as "used" and avoid gc */
MEMORY
{
CODE ( rx) : ORIGIN = 0x08000000, LENGTH = 3072k /* 3072KB flash */
DATA ( rw) : ORIGIN = 0x20000000, LENGTH = 192k /* 192KB sram */
}
ENTRY( Reset_Handler)
_system_stack_size = 0x200;
SECTIONS
{
.text :
{
. = ALIGN( 4 ) ;
_stext = . ;
KEEP( *( .isr_vector)) /* Startup code */
. = ALIGN( 4 ) ;
*( .text) /* remaining code */
*( .text.*) /* remaining code */
*( .rodata) /* read-only data ( constants) */
*( .rodata*)
*( .glue_7)
*( .glue_7t)
*( .gnu.linkonce.t*)
/* section information for finsh shell */
. = ALIGN( 4 ) ;
__fsymtab_start = . ;
KEEP( *( FSymTab))
__fsymtab_end = . ;
. = ALIGN( 4 ) ;
__vsymtab_start = . ;
KEEP( *( VSymTab))
__vsymtab_end = . ;
. = ALIGN( 4 ) ;
/* section information for initial. */
. = ALIGN( 4 ) ;
__rt_init_start = . ;
KEEP( *( SORT( .rti_fn*)) )
__rt_init_end = . ;
. = ALIGN( 4 ) ;
. = ALIGN( 4 ) ;
_etext = . ;
} > CODE = 0
/* .ARM.exidx is sorted, so has to go in its own output section. */
__exidx_start = . ;
.ARM.exidx :
{
*( .ARM.exidx* .gnu.linkonce.armexidx.*)
/* This is used by the startup in order to initialize the .data secion */
_sidata = . ;
} > CODE
__exidx_end = . ;
/* .data section which is used for initialized data */
.data : AT ( _sidata)
{
. = ALIGN( 4 ) ;
/* This is used by the startup in order to initialize the .data secion */
_sdata = . ;
*( .data)
*( .data.*)
*( .gnu.linkonce.d*)
. = ALIGN( 4 ) ;
/* This is used by the startup in order to initialize the .data secion */
_edata = . ;
} > DATA
.stack :
{
. = . + _system_stack_size;
. = ALIGN( 4 ) ;
_estack = . ;
} > DATA
__bss_start = . ;
.bss :
{
. = ALIGN( 4 ) ;
/* This is used by the startup in order to initialize the .bss secion */
_sbss = . ;
*( .bss)
*( .bss.*)
*( COMMON)
. = ALIGN( 4 ) ;
/* This is used by the startup in order to initialize the .bss secion */
_ebss = . ;
*( .bss.init)
} > DATA
__bss_end = . ;
_end = . ;
/* Stabs debugging sections. */
.stab 0 : { *( .stab) }
.stabstr 0 : { *( .stabstr) }
.stab.excl 0 : { *( .stab.excl) }
.stab.exclstr 0 : { *( .stab.exclstr) }
.stab.index 0 : { *( .stab.index) }
.stab.indexstr 0 : { *( .stab.indexstr) }
.comment 0 : { *( .comment) }
/* DWARF debug sections.
* Symbols in the DWARF debugging sections are relative to the beginning
* of the section so we begin them at 0 . */
/* DWARF 1 */
.debug 0 : { *( .debug) }
.line 0 : { *( .line) }
/* GNU DWARF 1 extensions */
.debug_srcinfo 0 : { *( .debug_srcinfo) }
.debug_sfnames 0 : { *( .debug_sfnames) }
/* DWARF 1.1 and DWARF 2 */
.debug_aranges 0 : { *( .debug_aranges) }
.debug_pubnames 0 : { *( .debug_pubnames) }
/* DWARF 2 */
.debug_info 0 : { *( .debug_info .gnu.linkonce.wi.*) }
.debug_abbrev 0 : { *( .debug_abbrev) }
.debug_line 0 : { *( .debug_line) }
.debug_frame 0 : { *( .debug_frame) }
.debug_str 0 : { *( .debug_str) }
.debug_loc 0 : { *( .debug_loc) }
.debug_macinfo 0 : { *( .debug_macinfo) }
/* SGI/MIPS DWARF 2 extensions */
.debug_weaknames 0 : { *( .debug_weaknames) }
.debug_funcnames 0 : { *( .debug_funcnames) }
.debug_typenames 0 : { *( .debug_typenames) }
.debug_varnames 0 : { *( .debug_varnames) }
}
1 2 3 4 5 6 7 8 9 10 11 12 13 14 15 16 17 18 19 20 21 22 23 24 25 26 27 28 29 30 31 32 33 34 35 36 37 38 39 40 41 42 43 44 45 46 47 48 49 50 51 52 53 54 55 56 57 58 59 60 61 62 63 64 65 66 67 68 69 70 71 72 73 74 75 76 77 78 79 80 81 82 83 84 85 86 87 88 89 90 91 92 93 94 95 96 97 98 99 100 101 102 103 104 105 106 107 108 109 110 111 112 113 114 115 116 117 118 119 120 121 122 123 124 125 126 127 128 129 130 131 132 133 134 135 136 137 1 2 3 4 5 6 7 8 9 10 11 12 13 14 15 16 17 18 19 20 21 22 23 24 25 26 27 28 29 30 31 32 33 34 35 36 37 38 39 40 41 42 43 44 45 46 47 48 49 50 51 52 53 54 55 56 57 58 59 60 61 62 63 64 65 66 67 68 69 70 71 72 73 74 75 76 77 78 79 80 81 82 83 84 85 86 87 88 89 90 91 92 93 94 95 96 97 98 99 100 101 102 103 104 105 106 107 108 109 110 111 112 113 114 115 116 117 118 119 120 121 122 123 124 125 126 127 128 129 130 131 132 133 134 135 136 137
该文件是GCC编译的链接脚本,根据《GD32F407xx_Datasheet_Rev2.1》可知,GD32F407VKT6的flash大小为3072KB,SRAM大小为192KB,因此CODE和DATA 的LENGTH分别设置为3072KB和192KB,其他芯片类似,但其实地址都是一样的。
(3) 修改bsp/gd32/gd32407v-start/board/linker_scripts/link.sct
该文件是MDK的连接脚本,根据《GD32F407xx_Datasheet_Rev2.1》手册,因此需要将 LR_IROM1 和 ER_IROM1 的参数设置为 0x00300000;RAM 的大小为192k,因此需要将 RW_IRAM1 的参数设置为 0x00030000。
; *************************************************************
; *** Scatter-Loading Description File generated by uVision ***
; *************************************************************
LR_IROM1 0x08000000 0x00300000 { ; load region size_region
ER_IROM1 0x08000000 0x00300000 { ; load address = execution address
*.o ( RESET, +First)
*( InRoot$$ Sections)
.ANY ( +RO)
}
RW_IRAM1 0x20000000 0x00030000 { ; RW data
.ANY ( +RW +ZI)
}
}
(4) 修改bsp/gd32/gd32407v-start/board/board.h文件
修改后内容如下:
# ifndef __BOARD_H__ # define __BOARD_H__ # include "gd32f4xx.h" # include "drv_usart.h" # include "drv_gpio.h" # include "gd32f4xx_exti.h" # define EXT_SDRAM_BEGIN ( 0xC0000000U ) # define EXT_SDRAM_END ( EXT_SDRAM_BEGIN + ( 32U * 1024 * 1024 ) ) # ifdef __ICCARM__ extern char __ICFEDIT_region_RAM_end__;
# define GD32_SRAM_END & __ICFEDIT_region_RAM_end__# else # define GD32_SRAM_SIZE 192 # define GD32_SRAM_END ( 0x20000000 + GD32_SRAM_SIZE * 1024 ) # endif # ifdef __CC_ARM extern int Image$$RW_IRAM1$$ZI$$Limit;
# define HEAP_BEGIN ( & Image$$RW_IRAM1$$ZI$$Limit) # elif __ICCARM__ # pragma section= "HEAP" # define HEAP_BEGIN ( __segment_end ( "HEAP" ) ) # else extern int __bss_end;
# define HEAP_BEGIN ( & __bss_end) # endif # define HEAP_END GD32_SRAM_END # endif
1 2 3 4 5 6 7 8 9 10 11 12 13 14 15 16 17 18 19 20 21 22 23 24 25 26 27 28 29 30 31 32 33 34 35 36 37 1 2 3 4 5 6 7 8 9 10 11 12 13 14 15 16 17 18 19 20 21 22 23 24 25 26 27 28 29 30 31 32 33 34 35 36 37
值得注意的是,不同的编译器规定的堆栈内存的起始地址 HEAP_BEGIN 和结束地址 HEAP_END。这里 HEAP_BEGIN 和 HEAP_END 的值需要和前面的链接脚本是一致的,需要结合实际去修改。
(5) 修改bsp/gd32/gd32407v-start/board/board.c文件
修改后的文件如下:
# include <stdint.h> # include <rthw.h> # include <rtthread.h> # include <board.h> void Error_Handler ( void )
{
while ( 1 )
{
}
}
void SystemClock_Config ( void )
{
SysTick_Config ( SystemCoreClock / RT_TICK_PER_SECOND) ;
NVIC_SetPriority ( SysTick_IRQn, 0 ) ;
}
void SysTick_Handler ( void )
{
rt_interrupt_enter ( ) ;
rt_tick_increase ( ) ;
rt_interrupt_leave ( ) ;
}
void rt_hw_board_init ( )
{
# define NVIC_VTOR_MASK 0x3FFFFF80 # ifdef VECT_TAB_RAM -> VTOR = ( 0x10000000 & NVIC_VTOR_MASK) ;
# else -> VTOR = ( 0x08000000 & NVIC_VTOR_MASK) ;
# endif SystemClock_Config ( ) ;
# ifdef RT_USING_COMPONENTS_INIT rt_components_board_init ( ) ;
# endif # ifdef RT_USING_CONSOLE rt_console_set_device ( RT_CONSOLE_DEVICE_NAME) ;
# endif # ifdef BSP_USING_SDRAM rt_system_heap_init ( ( void * ) EXT_SDRAM_BEGIN, ( void * ) EXT_SDRAM_END) ;
# else rt_system_heap_init ( ( void * ) HEAP_BEGIN, ( void * ) HEAP_END) ;
# endif }
1 2 3 4 5 6 7 8 9 10 11 12 13 14 15 16 17 18 19 20 21 22 23 24 25 26 27 28 29 30 31 32 33 34 35 36 37 38 39 40 41 42 43 44 45 46 47 48 49 50 51 52 53 54 55 56 57 58 59 60 61 62 63 64 65 66 67 68 69 70 71 72 73 74 1 2 3 4 5 6 7 8 9 10 11 12 13 14 15 16 17 18 19 20 21 22 23 24 25 26 27 28 29 30 31 32 33 34 35 36 37 38 39 40 41 42 43 44 45 46 47 48 49 50 51 52 53 54 55 56 57 58 59 60 61 62 63 64 65 66 67 68 69 70 71 72 73 74
该文件重点关注的就是SystemClock_Config配置,SystemCoreClock的定义在system_gd32f4xx.c中定义的。
(6) 修改bsp/gd32/gd32407v-start/board/Kconfig文件
修改后内容如下:
menu "Hardware Drivers Config"

config SOC_GD32407V
    bool
    select SOC_SERIES_GD32F4
    select RT_USING_COMPONENTS_INIT
    select RT_USING_USER_MAIN
    default y

menu "Onboard Peripheral Drivers"

endmenu

menu "On-chip Peripheral Drivers"

    config BSP_USING_GPIO
        bool "Enable GPIO"
        select RT_USING_PIN
        default y

    menuconfig BSP_USING_UART
        bool "Enable UART"
        default y
        select RT_USING_SERIAL
        if BSP_USING_UART
            config BSP_USING_UART1
                bool "Enable UART1"
                default y

            config BSP_UART1_RX_USING_DMA
                bool "Enable UART1 RX DMA"
                depends on BSP_USING_UART1 && RT_SERIAL_USING_DMA
                default n
        endif

    menuconfig BSP_USING_SPI
        bool "Enable SPI BUS"
        default n
        select RT_USING_SPI
        if BSP_USING_SPI
            config BSP_USING_SPI1
                bool "Enable SPI1 BUS"
                default n

            config BSP_SPI1_TX_USING_DMA
                bool "Enable SPI1 TX DMA"
                depends on BSP_USING_SPI1
                default n

            config BSP_SPI1_RX_USING_DMA
                bool "Enable SPI1 RX DMA"
                depends on BSP_USING_SPI1
                select BSP_SPI1_TX_USING_DMA
                default n
        endif

    menuconfig BSP_USING_I2C1
        bool "Enable I2C1 BUS (software simulation)"
        default n
        select RT_USING_I2C
        select RT_USING_I2C_BITOPS
        select RT_USING_PIN
        if BSP_USING_I2C1
            config BSP_I2C1_SCL_PIN
                int "i2c1 scl pin number"
                range 1 216
                default 24
            config BSP_I2C1_SDA_PIN
                int "I2C1 sda pin number"
                range 1 216
                default 25
        endif
    source "../libraries/HAL_Drivers/Kconfig"

endmenu

menu "Board extended module Drivers"

endmenu

endmenu
1 2 3 4 5 6 7 8 9 10 11 12 13 14 15 16 17 18 19 20 21 22 23 24 25 26 27 28 29 30 31 32 33 34 35 36 37 38 39 40 41 42 43 44 45 46 47 48 49 50 51 52 53 54 55 56 57 58 59 60 61 62 63 64 65 66 67 68 69 70 71 72 73 74 75 76 77 78 79 80 81 1 2 3 4 5 6 7 8 9 10 11 12 13 14 15 16 17 18 19 20 21 22 23 24 25 26 27 28 29 30 31 32 33 34 35 36 37 38 39 40 41 42 43 44 45 46 47 48 49 50 51 52 53 54 55 56 57 58 59 60 61 62 63 64 65 66 67 68 69 70 71 72 73 74 75 76 77 78 79 80 81
这个文件就是配置板子驱动的,这里可根据实际需求添加。
(7) 修改bsp/gd32/gd32407v-start/board/SConscript文件
修改后内容如下:
import os
import rtconfig
from building import *
Import( 'SDK_LIB' )
cwd = GetCurrentDir( )
src = Split( '''
board.c
''' )
path = [ cwd]
startup_path_prefix = SDK_LIB
if rtconfig. CROSS_TOOL == 'gcc' :
src += [ startup_path_prefix + '/GD32F4xx_HAL/CMSIS/GD/GD32F4xx/Source/GCC/startup_gd32f4xx.S' ]
elif rtconfig. CROSS_TOOL == 'keil' :
src += [ startup_path_prefix + '/GD32F4xx_HAL/CMSIS/GD/GD32F4xx/Source/ARM/startup_gd32f4xx.s' ]
elif rtconfig. CROSS_TOOL == 'iar' :
src += [ startup_path_prefix + '/GD32F4xx_HAL/CMSIS/GD/GD32F4xx/Source/IAR/startup_gd32f4xx.s' ]
CPPDEFINES = [ 'GD32F407xx' ]
group = DefineGroup( 'Drivers' , src, depend = [ '' ] , CPPPATH = path, CPPDEFINES = CPPDEFINES)
Return( 'group' )
1 2 3 4 5 6 7 8 9 10 11 12 13 14 15 16 17 18 19 20 21 22 23 24 25 26 27 28 1 2 3 4 5 6 7 8 9 10 11 12 13 14 15 16 17 18 19 20 21 22 23 24 25 26 27 28
该文件主要添加board文件夹的.c文件和头文件路径。另外根据开发环境选择相应的汇编文件,和前面的libraries的SConscript语法是一样,文件的结构都是类似的,这里就没有注释了。
到这里,基本所有的依赖脚本都配置完成了,接下来将通过menuconfig配置工程。
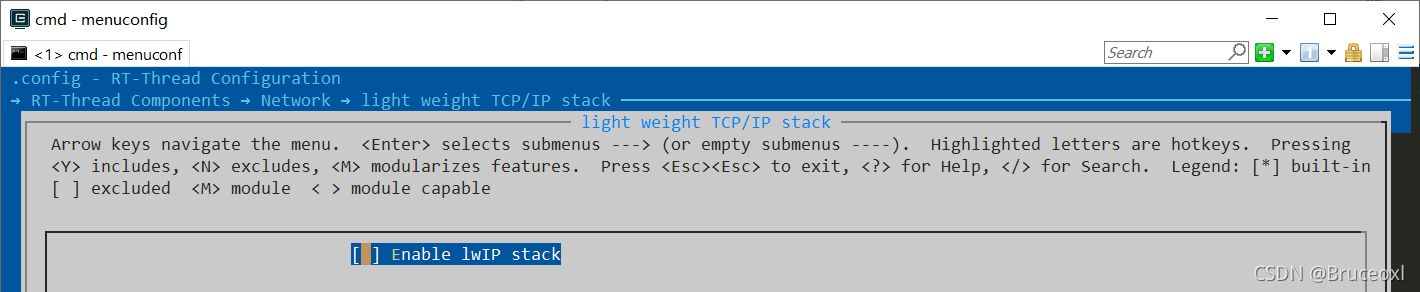
6.menuconfig配置
关闭套接字抽象层。
关闭网络设备接口。
关闭LWIP协议栈。
GD32407V-START板载没有以太网,因此这里主要是关闭网络相关的内容,当然GD32407V-START的资源丰富,不关这些其实也不影响,如果是其他MCU,根据实际需求自行修改吧。
7.驱动修改
一个基本的BSP中,串口是必不可少的,所以还需要编写串口驱动,这里使用的串口2作为调试串口。
关于串口和LED的驱动可以查看源码,这里就不贴出来了。
8.应用开发
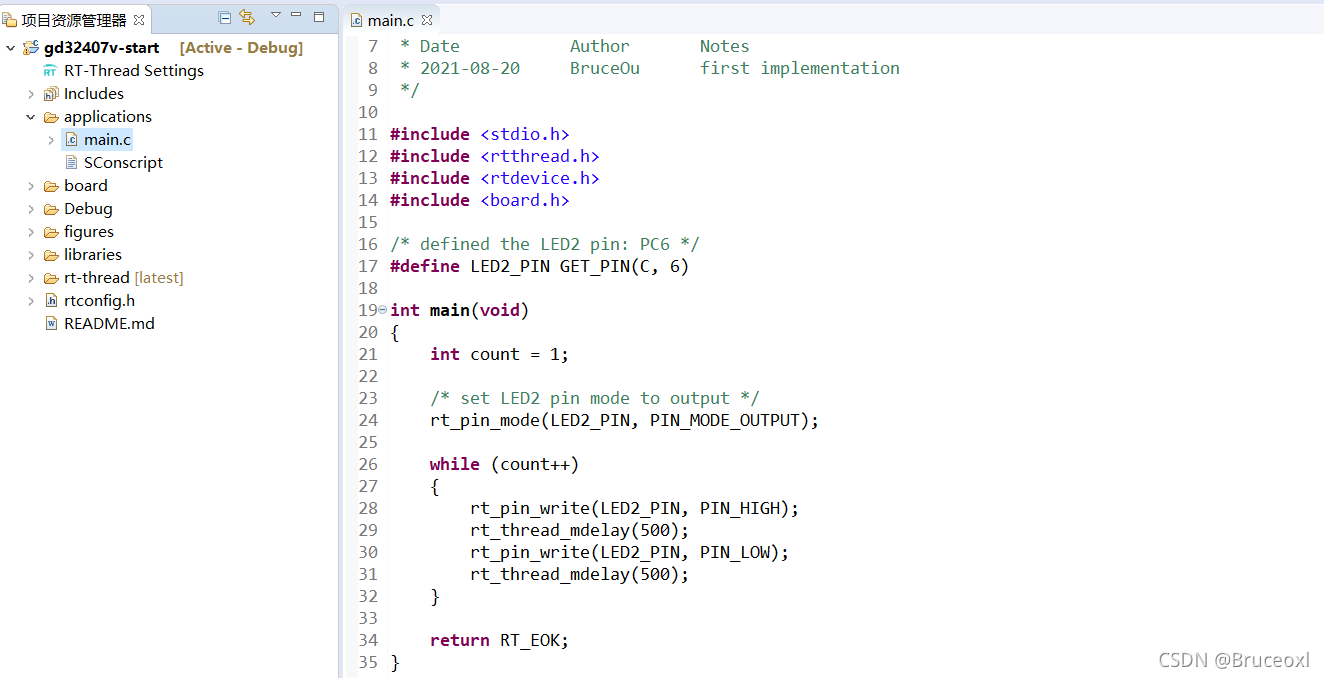
笔者在applications的main.c中添加LED的应用代码,
# include <stdio.h> # include <rtthread.h> # include <rtdevice.h> # include <board.h> # define LED2_PIN GET_PIN ( C, 6 ) int main ( void )
{
int count = 1 ;
rt_pin_mode ( LED2_PIN, PIN_MODE_OUTPUT) ;
while ( count++ )
{
rt_pin_write ( LED2_PIN, PIN_HIGH) ;
rt_thread_mdelay ( 500 ) ;
rt_pin_write ( LED2_PIN, PIN_LOW) ;
rt_thread_mdelay ( 500 ) ;
}
return RT_EOK;
}
1 2 3 4 5 6 7 8 9 10 11 12 13 14 15 16 17 18 19 20 21 22 23 24 25 1 2 3 4 5 6 7 8 9 10 11 12 13 14 15 16 17 18 19 20 21 22 23 24 25
当然,这需要GPIO驱动的支持。
9.使用ENV编译工程
编译成功打印信息如下:
10.使用env生成MDK工程
生成MDK工程后,打开MDK工程进行编译
成功编译打印信息如下:
【注】笔者没有IAR环境,有兴趣的朋友自行去开发吧。
【注】GD32407V-START开发板还有两个USB接口,后面有空在考虑做到BSP里面吧,目前自有GPIO和串口,当然啦,像SPI等驱动也会一步一步集成进来,敬请期待吧。
2.3使用GD-Link 下载调试GD32
前面使用ENV和MDK成功编译可BSP,那么接下来就是下载调试环节,下载需要下载器,而GD32部分开发板自带GD-link,可以用开发板上自带的GD-link调试仿真代码,不带的可外接GD-link模块,还是很方便的。具体操作方法如下。
1.第一次使用GD-link插入电脑后,会自动安装驱动。
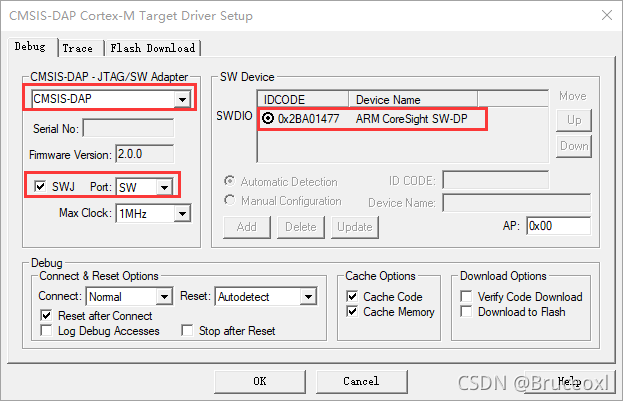
在Options for Target -> Debug 中选择“CMSIS-DAP Debugger”,部分客户反馈找不到这一驱动器选项,那是因为MDK版本过低,只有Keil4.74以上的版本和Keil5才支持CMSIS-DAP Debugger选项。
2.在Options for Target -> Debug ->Settings勾选SWJ、 Port选择 SW。右框IDcode会出现”0xXBAXXXXX”。
3.在Options for Target -> Debug ->Settings -> Flash Download中添加GD32的flash算法。
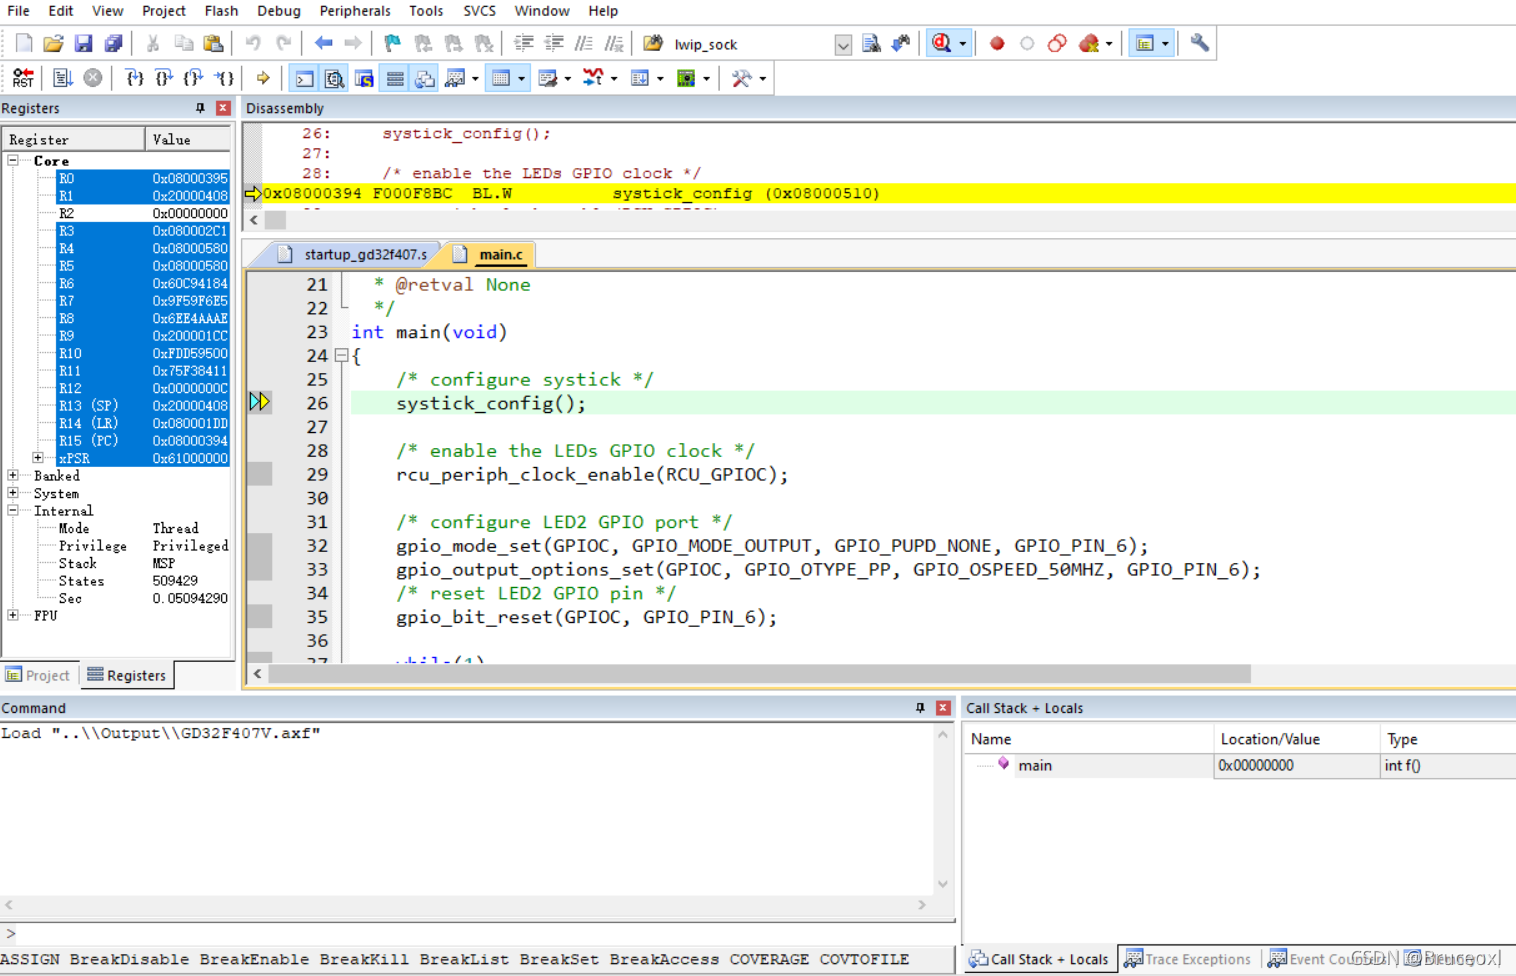
4.单击下图的快捷方式“debug”, 即可使用GD-Link进行仿真。
当然啦,也可使用GD-Link下载程序。
下载程序成功后,打印信息如下:
接上串口,打印信息如下:
同时LED会不断闪烁。
2.4 RT-Thread studio开发
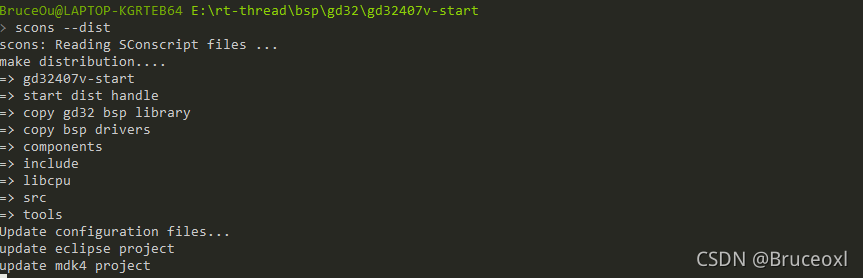
当然,该工程也可导出使用rt-thread studio开发。
先使用scons --dist导出工程。
再将工程导入rt-thread studio中
最后,就可在rt-thread studio就可进行开发工作了。
当然啦,后面也可在rt-thread studio中新建工程时选择笔者提交的GD32407V-START的BSP。
关于BSP的移植就到这里了,当然还有很多内容,这里只是抛砖引玉。最后希望更多的朋友加入进来,为国产RTOS贡献自己的力量吧。
以上代码已经提交到RT-Thread 中。
BSP地址